We have come to the final part in preparing for the MESBG Ultimate Campaign, concerning rules & ideas at least. There is still a lot of physical preparation that needs to be done (the boards, terrain and miniatures). But that is something I will save for another time. Safe to say I likely won’t be playing this campaign until Spring or Summer 2027, at the earliest. Nevertheless, I wanted to get these thoughts out much earlier, to allow for feedback and additional tinkering.
Part 5: The scenarios (this part)
The scenarios
At the time of writing, there are 245 unique scenarios planned for this campaign. It’s very likely this exact number will change when I look at things more closely, or when Games Workshop releases new additional scenarios. But it is already more detailed than just making a list of all unique scenarios available. Some thought has definitely already been put in here. However, I don’t want to use this post to go over those 245 scenarios. The general outline and ideas are already sketched out in part 1: the main structure of the campaign.
Instead, I want to focus on just the first scenario to open the campaign with. The reason is that this is a homebrewed scenario. There have been very few official Second Age scenarios, and I’m still waiting on the first official supplement on the topic. I am not sure there will be one, at least in time for me to kickstart this campaign. So I took matters into my own hand, and came up with a 3-scenario arc covering the end of the Second Age, with a fourth scenario as an Epilogue (The Gladden Fields).
These scenarios are:
- Battle of Dagorlad (homebrewed)
- Sauron the Deceiver (tweaked from Battle Games in Middle-earth #45)
- The Last Alliance (based on Armies of the Lord of the Rings (2018))
- The Gladden Fields (based on Gondor in Flames (2007) & Kingdoms of Men (2011))
In this post, I will only cover the first one as the others already have a foundation in an official supplement.
The † symbol denotes Heroes who will historically die during or shortly after the battle. All stated numbers and point values are approximations:
#1 – Battle of Dagorlad
Participants
| Good (9 Heroes, 3 Captains, 1 Shaman, 7 Banner, 160 Infantry): 3357 points | 173 models | 59 bows | 8 throwing weapon | Evil (1 Hero, 10 Captains, 5 Trolls, 3 Shaman, 9 Banner, 12 Cavalry, 150 Infantry): 2415 points | 157 models | 16 bows | 1 throwing weapon |
| Silvan Elves (3 Heroes, 2 Captains, 1 Shaman, 3 Banner, 76 Infantry) | Main force (1 Hero, 7 Captains, 3 Trolls, 2 Shaman, 6 Banner, 108 Infantry): |
| Oropher † (Hero of Legend (I) | General) | 1 Mordor Troll Chieftain* *buffed with Fearless and 1 additional M/W/F (Hero of Valour (II) | General) |
| 8 Palace Guard with Shield | 3 Mordor Trolls |
| 8 Palace Guard with Spear | 12 Morannon Orc with Shield & Spear |
| 1 Mirkwood Warrior with Banner | Black Numenorean Marshal (Hero of Fortitude (III)) |
| Thranduil (unarmoured) (Hero of Valour (II)) | 12 Black Numenorean |
| 4 Palace Guard with Shield & Spear | 1 Black Numenorean with Banner |
| 10 Mirkwood Ranger | Morannon Orc Captain with Two-handed weapon (Hero of Fortitude (III)) |
| 1 Mirkwood Ranger Captain (Hero of Fortitude (III)) | 3 Morannon Orc |
| 10 Mirkwood Ranger | 3 Morannon Orc with Shield & Spear |
| 3 Morannon Orc with Shield | |
| Amdír † (Hero of Valour (II)) | 3 Morannon Orc with Spear |
| 12 Guard of the Galadhrim | 4x Orc Captain with Shield (Hero of Fortitude (III)) |
| 1 Guard of the Galadhrim Court with Banner | 4x 2 Orc Warrior 2-handed |
| 1 Wood Elf Captain (Hero of Fortitude (III)) | 4x 2 Orc Warrior Bow |
| 4 Wood Elf Warrior with throwing weapons | 4x 4 Orc Warrior Shield |
| 4 Wood Elf Warrior Bow | 4x 4 Orc Warrior Spear |
| 4 Wood Elf Warrior Spear | 4x 1 Orc with Banner |
| 1 Lothlorien Stormcaller (Hero of Fortitude (III)) | 2x Orc Shaman (Minor Hero (IV)) |
| 4 Wood Elf Warrior | 2x 3 Morannon Orc with Shield |
| 4 Wood Elf Warrior Bow | 2x 3 Morannon Orc with Spear |
| 4 Wood Elf Warrior Spear | Easterling Captain (Hero of Fortitude (III)) |
| 4 Easterling Warrior Bow | |
| Last Alliance Relief force (5 Heroes, 1 Captain, 3 Banners, 72 Infantry) | 4 Easterling Warrior Shield |
| Gil-Galad with Shield (Hero of Legend (I)| General) | 4 Easterling Warrior Halberd + Shield |
| 4 High Elf Bow (King’s Guard) | 1 Easterling Banner |
| 4 High Elf Sword (King’s Guard) | |
| 4 High Elf Spear + Shield (King’s Guard) | Relief force (4 Captains, 1 Shaman, 2 Trolls, 3 Banner, 12 Cavalry, 42 Infantry) : |
| 1 High Elf Banner | 2 Mordor Trolls |
| Elrond (Hero of Valour (II)) | Morgul Knight Captain (Hero of Fortitude (III)) |
| 4 High Elf Bow | 10 Morgul Knight |
| 4 High Elf Sword | 1 Morgul Knight with War horn |
| 4 High Elf Spear + Shield | 1 Morgul Knight with Banner |
| 1 High Elf Banner | Orc Captain with Shield (Hero of Fortitude (III)) |
| Círdan (with Erestor model) (Hero of Fortitude (III)) | 2 Orc Warrior 2-handed |
| 4 High Elf Bow | 2 Orc Warrior Bow |
| 4 High Elf Sword | 4 Orc Warrior Shield |
| 4 High Elf Spear + Shield | 4 Orc Warrior Spear |
| High-Elf Captain (Hero of Fortitude (III)) | 1 Orc with Banner |
| 4 High Elf Bow | Orc Taskmaster (Hero of Fortitude (III)) |
| 4 High Elf Sword | 2 Orc Warrior 2-handed |
| 4 High Elf Spear + Shield | 2 Orc Warrior Bow |
| 4 Orc Warrior Shield | |
| Elendil (Hero of Legend (I)) | 4 Orc Warrior Spear |
| 4 Numenor with Longbow | Orc Shaman (Minor Hero (IV)) |
| 4 Numenor Shield | 3 Morannon Orc with Shield |
| 4 Numenor Shield + Spear | 3 Morannon Orc with Spear |
| 1 Numenor Banner | Easterling Captain (Hero of Fortitude (III)) |
| Isildur (Hero of Valour (II)) | 4 Easterling Warrior Bow |
| 4 Numenor with Longbow | 4 Easterling Warrior Shield |
| 4 Numenor Shield | 4 Easterling Warrior Halberd + Shield |
| 4 Numenor Shield + Spear | 1 Easterling Banner |
| Southern Relief force (1 Hero, 1 Banner, 12 Infantry) | |
| Anaríon † (Hero of Valour (II)) | |
| 4 Numenor with Longbow | |
| 4 Numenor Shield | |
| 4 Numenor Shield + Spear | |
| 1 Numenor Banner |
Homebrew profiles:
Oropher † (father of Thranduil: use old Thranduil model) (Hero of Legend (I) | General)
| Mv | FV | SV | S | D | A | W | C | I | M | W | F |
| 6″ | 7 | 2+ | 4 | 5 | 3 | 3 | 4+ | 4+ | 3 | 2 | 1 |
Wargear: Armour, Elven hand-a-half weapon, Elven cloak, Elf bow
Special rules: Woodland Creature,
Fury of the Elvenking (Active) – If Oropher is Outnumbered in a Combat, and successfully kills all enemy models that he was Engaged in Combat with, then in the following turn Oropher may declare a Heroic Combat for free.
Do not talk to me of Dragon fire (Active) – At the beginning of his Activation, Oropher can spend a Will Point to use this special rule. If he does, then until the end of the turn Oropher has the Terror special rule. Additionally, if Oropher has the Infantry Keyword when he uses this special rule, then each enemy model within 3″ of him, that is not Engaged in Combat, must take a Courage Test in an order chosen by Oropher controlling player. If the test is failed, they must immediately Move Directly Away from Oropher as far as they can, up to the limit of their Move Value. Models Moved by this special rule cannot Move again during the turn, but may otherwise act normally.
Circlet of Kings (Active) – Once per game, Oropher can automatically cast Aura of Dismay (no Will point is expended when using this special rule).
Heroic Action: Heroic Resolve, Heroic Strength, Heroic Strike
Race: Elf
Faction: Mirkwood
Unit Type: Hero, Infantry, Unique
Base Size: 25 mm
Amdír (Malgalad) † (Lorien: use Haldir model) (Hero of Valour (II))
| Mv | FV | SV | S | D | A | W | C | I | M | W | F |
| 6″ | 6 | 3+ | 4 | 4 | 2 | 3 | 3+ | 4+ | 3 | 3 | 1 |
Wargear: Elven hand-a-half weapon, Elven cloak
Special rules: Woodland Creature,
One Final Blow (Active) – If Amdír is slain in close combat, he may immediately make one Strength 4 Strike on each enemy model that was involved in the Combat in which Amdír was slain. Amdír may use Might to increase these To Wound rolls as normal.
Heroic Action: Heroic Resolve, Heroic Defence, Heroic Strike
Race: Elf
Faction: Lothlorien
Unit Type: Hero, Infantry, Unique
Base Size: 25 mm
Círdan (use old Glorfindel model) (Hero of Fortitude (III))
| Mv | FV | SV | S | D | A | W | C | I | M | W | F |
| 6″ | 5 | 3+ | 4 | 6 | 2 | 2 | 4+ | 3+ | 2 | 4 | 2 |
Wargear: Elven hand-a-half weapon, Heavy Armour
Special rules: Resistant to Magic, Terror, Woodland Creature,
The Shipwright’s Power (Passive) – Círdan gains a free Will Point at the start of each turn. If this free Will point is not spent by the end of the turn, it is lost.
Heroic Action: Heroic Channeling, Heroic Resolve
Magical Powers: As normal.
Race: Elf
Faction: Rivendell
Unit Type: Hero, Infantry, Unique
Base Size: 25 mm
Anarion † (use Éarnur model) (Hero of Valour (II))
| Mv | FV | SV | S | D | A | W | C | I | M | W | F |
| 6″ | 6 | 4+ | 5 | 7 | 3 | 2 | 4+ | 5+ | 3 | 2 | 1 |
Wargear: Heavy armour, Shield, Hand weapon
Special rules: Resistant to Magic
Heroic Action: Heroic Challenge, Heroic Strike, Heroic Strength
Race: Man
Faction: Númenor
Unit Type: Hero, Infantry, Unique
Base Size: 25 mm
Layout
The Scenario is played on a 6’x4’-board, consisting of three parts. The left 2’x4’ part represents the Dead Marshes and as such should contain multiple swamps. It contains an arid landscape, like the fields of Pelennor. The two 2’x4’ boards to the right have a rocky surface. On the eastern board edge, the Black Gate is placed.
Starting positions
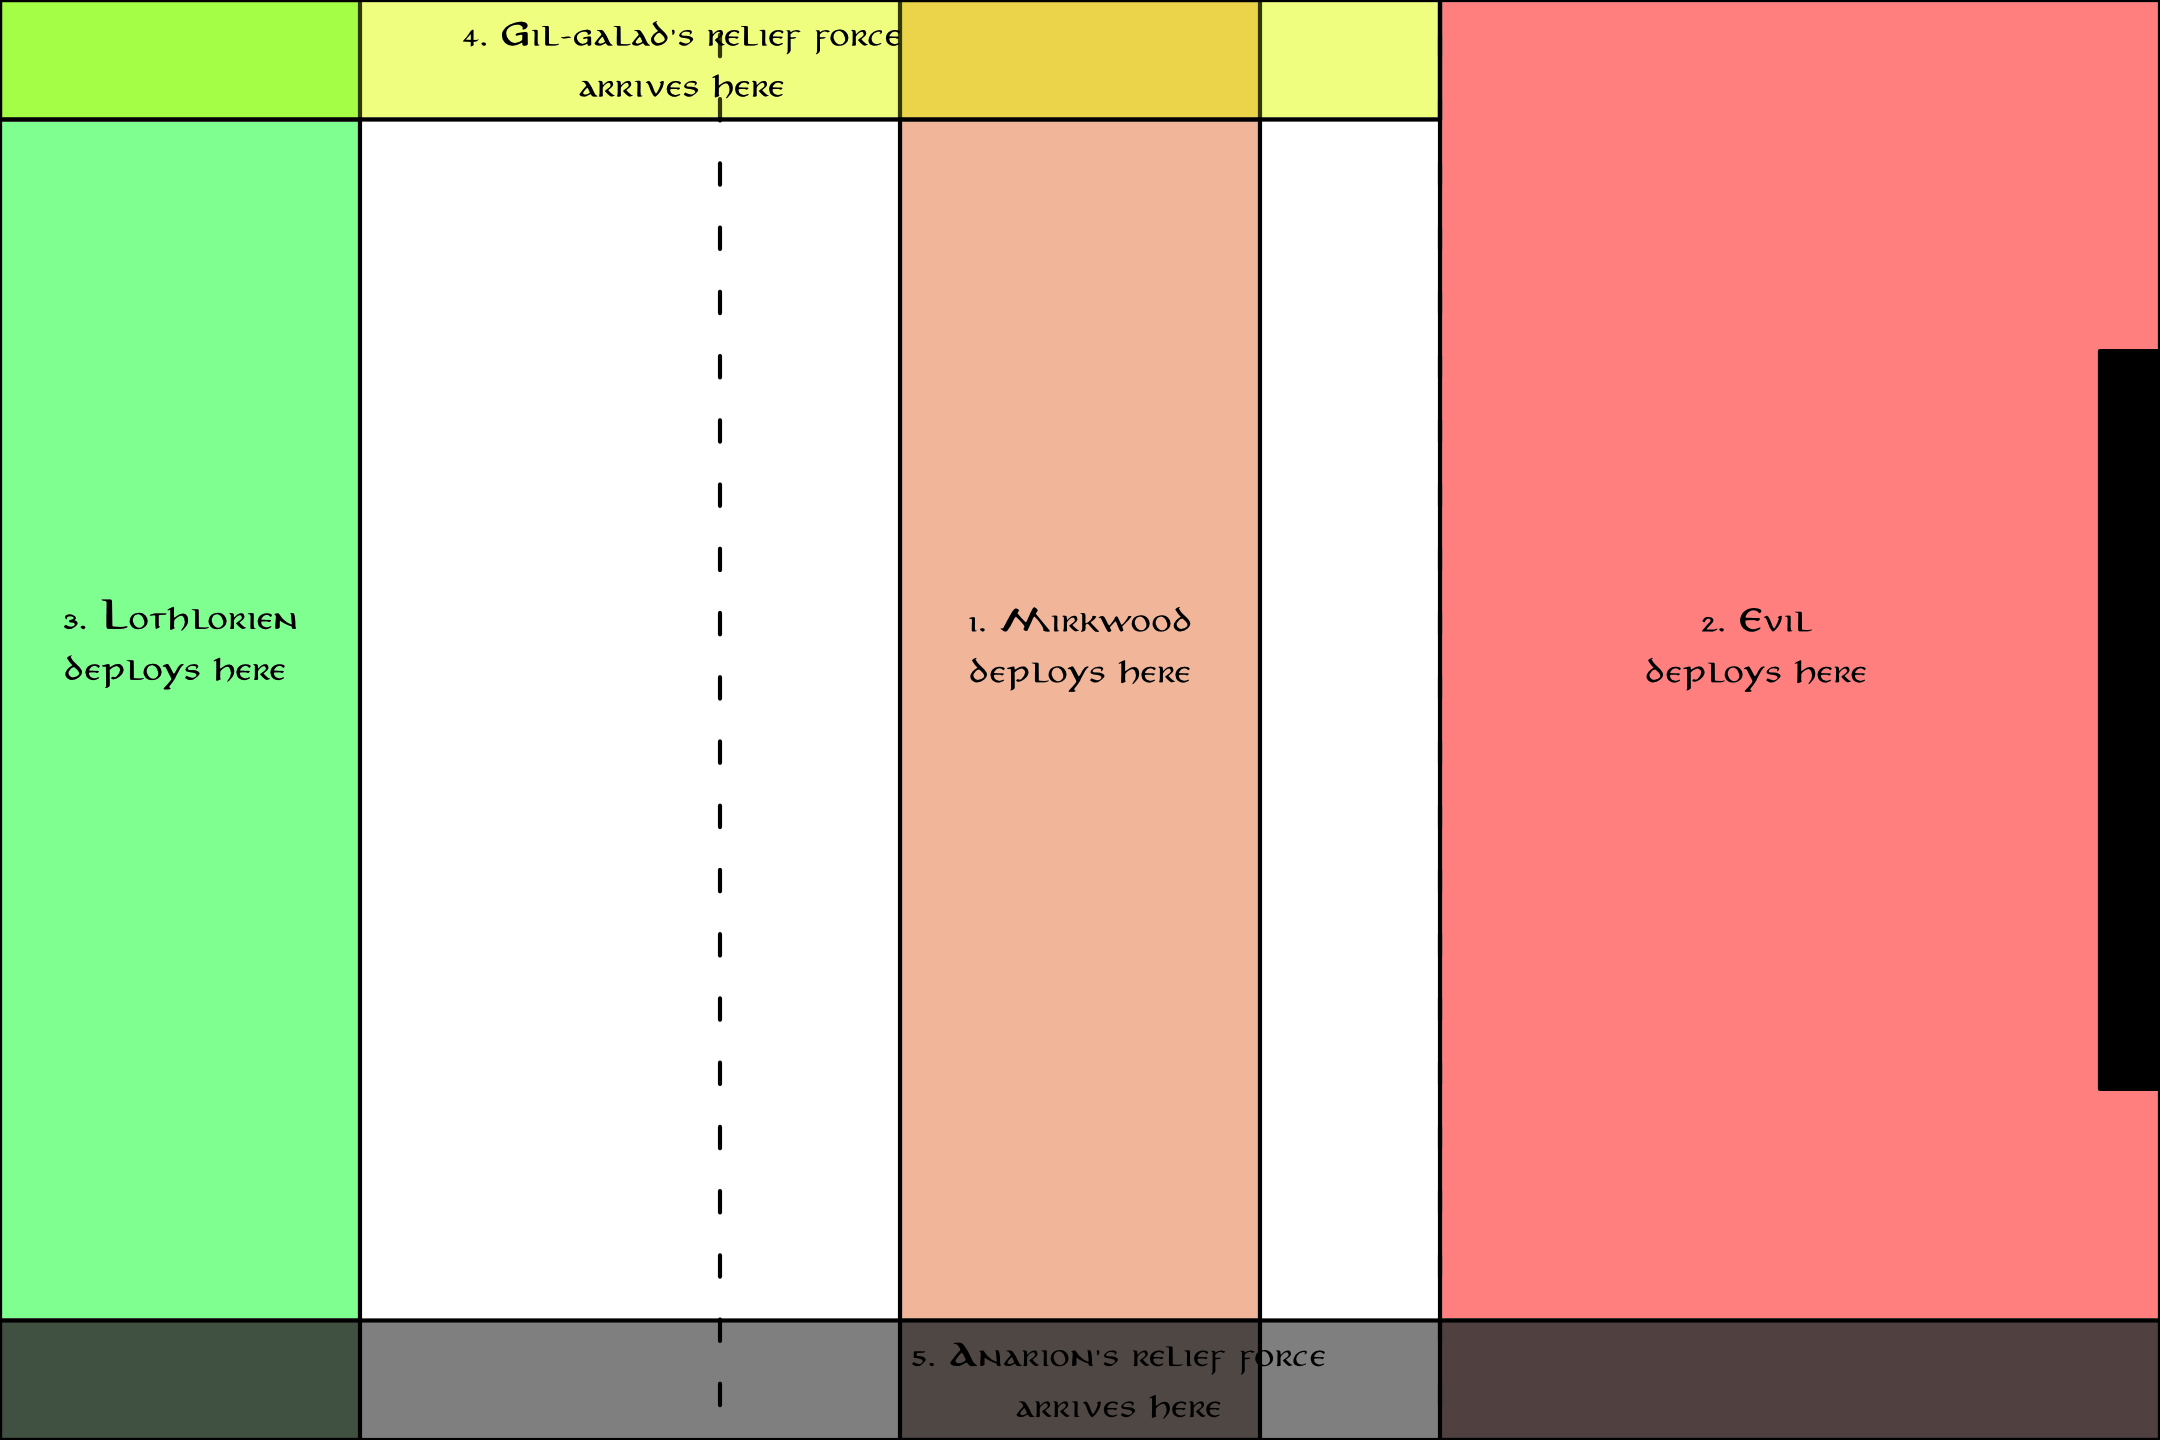
The Good player first deploys the Mirkwood part of their Silvan Elves forces 6” within from the centre line on the middle of the board.
The Evil player then deploys their forces anywhere within 2’ (24”) from the eastern board edge.
The Good player then deploys the rest of their Silvan Elves force (so the Lothlórien part) within 6” of the western board edge (so the Dead Marshes side).
Objectives
The Game ends until one side has completed their objective.
The Good side wins if the Evil forces have been Quartered (down to 47 models) and at least 4 Named Good Heroes end the turn in base contact with the Black Gate without having been Engaged in Combat that turn.
The Evil side wins if all the named Good Heroes are slain (with the exception of Thranduil, Círdan and Anarion; they don’t need to be slain to fulfil this objective).
If neither victory condition is possible, the game ends in a Draw.
Special rules
Endless Hordes – There is no end to the army of the Dark Lord.
The Evil side cannot be Broken. At the start of the turn where the Evil side would be Broken for the first time, the Evil Relief Force will enter from the Black Gate following the rules for Reinforcements.
Reinforcements are coming – Anarion is coming to aid the Last Alliance.
In the turn after the Evil Relief Force has entered the board, Anarion’s Relief Force can enter from the southern board edge following the rules for Reinforcements.
Valiant Silvan elves – The Silvan elves are valiant and ready to try and defeat Sauron’s armies.
The Good side starts with Priority in the first turn.
Additionally, the Silvan elves may not willingly Move in the western 2’ area (The Dead Marshes), unless when Making Way, retreating as part of a lost Fight or due to other forced effects. They are also not allowed to use the Shielding special rule.
Once the Silvan elves are Broken (down to 42 models) or from the 10th turn onwards, this special rule no longer applies.
Gil-Galad’s command – The Silvan elves had little sympathy for the Sindar and Noldor that were led by Gil-galad. As a result, they rashly charged against the numerous hosts of Mordor, before the King had given the order.
From the 11th turn onwards, there is a chance the Good’s side relief forces will turn up. From this point on, roll a D6 at the start of each turn. If the result is equal to or lower than the current turn number – 10, the Good player deploys Gil-galad’s relief force on the northern board edge via the rules for Reinforcements. On turn 11 this means a 1 is needed, and turn 16 will be the latest turn at which the relief force will appear.
Corruption of the Rings of Power – Once Sauron forged the One Ring, the Elfs wearing the Elven Rings immediately sensed his betrayal. As a result, they removed their Ring and refrained from using them until Sauron has been defeated.
No Good model can make use of their Elven Ring special rules.
Army bonuses
Good
“There were some who resisted” [The Last Alliance]
Friendly models may re-roll any dice that roll a 1 when making Courage Tests.
Strength of Numenor [The Last Alliance]
Whilst being supported by or supporting a friendly Elf model, friendly Numenor models may re-roll To Wound rolls of a natural 1 when making Strikes.
Rivendell only:
Whirl of Steel [The Last Alliance]
Whenever a friendly Rivendell Infantry model that is not Engaged in Combat is Charged, they may roll a D6. On a natural 6, the model that Charged them immediately suffers a Wound. If this model was a Cavalry model, roll a further D6. On a 1-3 it will be the Mount that suffers the wound, on a 4+ it will be the rider that suffers the Wound. This is considered an Active ability.
“Tangado haid, leithio i philinn!” [Lindon]
Whilst within 3″ of a friendly Hero, friendly Warrior models may re-roll failed To Hit rolls when making a shooting attack, providing they didn’t move in the preceding Move Phase.
The Power of the Noldor [Lindon]
Friendly models within 6″ of Gil-galad gain the Resistant to Magic special rule.
Defensive Stance [Rivendell]
Friendly Elf Warrior models may re-roll To Wound rolls of a natural 1 when making Strikes so long as they have not Moved during the preceding Move Phase.
Numenor only:
Blood of Numenor [Numenor]
Friendly Numenor models gain the Resistant to Magic special rule whilst they are within 6″ of a friendly Unique Numenor Hero model.
The Resolve of Men [Numenor]
Friendly Numenor models gain a bonus of +1 to any Courage tests they have to take.
The Line of Kings [Numenor]
If they have the Unique keyword, your General gains the General Hunter special rule. Additionally, your General must always accept a Heroic Challenge directed at them.
Mirkwood only:
Knife Mastery [Rangers of Mirkwood]
Friendly Elf models may re-roll To Wound Rolls of a natural 1 when making Strikes.
“The Elves of Mirkwood are not like their kin. They are less wise, and more dangerous” [Halls of Thranduil]
Friendly Mirkwood Warrior models within 3″ of Oropher gain a bonus of +1 To Wound when making Strikes.
Stoic Command [Halls of Thranduil]
Friendly Warrior models treat your General (Oropher, if killed: Thranduil) as a banner.
Lothlórien only:
“They say a great sorceress lives in these woods…” [Lothlorien]
Friendly Lothlorien models gain the Resistant to Magic special rule.
“The Dwarf breathes so loud, we could have shot him in the dark” [Lothlorien]
Friendly Lothlorien models may re-roll To Hit rolls of a 1 when making a shooting attack if the target of the shooting attack is unable to see them due to the effects of an Elven cloak.
Evil
Bring the City to its Knees [Legions of Mordor]
Friendly Hero models may re-roll To Wound Rolls of a natural 1 when making Strikes against an enemy Hero model.
Greatest of the Trolls [The Black Gate]
The Mordor Troll Chieftain that is your General gains the Fearless special rule, and an additional point each of Might, Will and Fate.
The Hordes of Mordor [The Black Gate]
Friendly Mordor Orc models engaged in a Combat gain a bonus of +1 To Wound when making strikes against an outnumbered opponent.
Temptation of Sauron [The Black Gate]
At the start of each Move Phase, before the Declare Heroic Actions Step, you may choose a single enemy model on the battlefield. The chosen model must immediately take an Intelligence Test. If the test if failed, you may immediately Move the chosen model up to its Move Value following all the usual rules for moving, including making them Charge if you wish. The chosen model may not Move later in the Move Phase, but may otherwise act normally.
The Great Eye [Army of the Great Eye]
At the beginning of the game, place a 25mm Great Eye Marker on the battlefield in your deployment zone. At the end of each Move Phase, remove the Great Eye Marker and roll a D6. On a 2+, you may place it anywhere within 6″ of where it was. On a 1, Sauron has been distracted and your opponent may place it anywhere within 12″ of where it was. The Great Eye Marker can never be placed so that it overlaps another model’s base, though models may finish their Move overlapping the Great Eye Marker.
- Friendly models treat the Great Eye Marker as a banner.
- Enemy models within 3″ of the Great Eye Marker suffer a -1 penalty to any Courage or Intelligence Tests they are required to take.
- If your opponent’s Army contains a Ringbearer (with the exception of Sauron), then if during the End Phase of any turn they are wearing the Ring and wtihin 3″ of the Great Eye Marker, they must roll a D6. On a 3+, they succumb to Sauron and are immediately removed as a casualty.
- In [Scenarios that don’t have a specific deployment zone, such as Recconoitre or those that use the Maelstrom of Battle special rule], the Great Eye Marker will be deployed touching its controlling player’s board edge. In Maelstrom of Battle scenarios, determine which board edge is the controlling player’s in the same manner as if they had a Siege Engine as described on page 139 of the Middle-earth Strategy Battle Game Rules Manual.
Easterling only:
Press the advantage [The Easterlings]
Whilst the enemy Army is Broken, friendly Easterling Hero models gain the Fearless special rule.
Campaign effects
The surviving force of Silvan elves is added to the Participants in the next scenario (#2 Sauron the Deceiver).
If the Troll Chieftain survives, he gets added to the Participants in the scenario (#3 Siege of Barad-dûr) and recovers following 1 Recovery Roll.
Good – The Good player rolls double for their Recovery rolls and chooses the best result in each instance. For historical deaths, the result will still automatically be a 1.
Draw – Neither side gets an advantage.
Evil – The Good player rolls double for their Recovery rolls and chooses the worst result in each instance.
Your input
Well, this is probably a lot to take in. But I’d love to know your thoughts, doubts and ideas!
I’m quick on the draw to comment on this one! 🙂 My first thought is that this will be an epic scenario. The model count is really high and so is the number of heroes. Most people that start playing MESBG dream of playing a game like this so to open your campaign (of nearly 250 scenarios!) with this one is really cool and impressive. I know it is a ways away but I really look forward to seeing this report and the board you create for it too!